Canonical released Ubuntu 24.10 “Oracular Oriole” on Oct. 10, 2024. This latest version brings performance improvements and enhanced hardware support while also marking a special milestone — 20 years since Ubuntu’s first stable release.
As the name suggests, Ubuntu 24.04 LTS (Long-Term Support) is still being supported and will continue to receive five years of free security maintenance updates.
In this guide, you’ll learn how to upgrade your existing Ubuntu 24.04 installation to the latest Ubuntu 24.10.
Why Upgrade to Ubuntu 24.10?
As Ubuntu 24.04 is an LTS release, there’s no requirement to upgrade since it will be supported for at least five years. You can extend this for another five years through an Ubuntu Pro subscription, which is free for personal devices. Paid subscribers who install the Legacy Support add-on can benefit from an additional two years of coverage.
Ubuntu 24.10 will receive security and maintenance for just nine months out of the box. However, it is also compatible with Ubuntu Pro and comes with several upgrades.
For instance, Ubuntu now ships with the latest available version of the upstream Linux kernel. The kernel version is determined by Ubuntu’s freeze date, even if the kernel is still in Release Candidate (RC) status. This approach allows users to benefit from the latest features, though it may come at the possible expense of system stability.
The main flavor of Ubuntu 24.10 also ships with the latest Gnome 47 desktop, an upgraded App Center, an experimental Security Center, and better management of Snap packages.
See the official Oracular Oriole announcement to discover all the latest features in Ubuntu.
How It Works
Ubuntu 22.04 supports upgrading via the command line or the built-in software updater.
The simplest way to upgrade is to launch the software updater to ensure you have the latest version of Ubuntu 22.04 (currently 22.04.01). Then, you can modify the updater settings to allow you to upgrade to a regular non-LTS release of Ubuntu.
Rerunning the software updater will display the option to upgrade your OS.

If you choose to proceed, the Ubuntu upgrade tool will connect to the relevant software channels and download the necessary packages.
Ubuntu disables third-party repositories and PPAs by default during upgrade. However, once the OS is upgraded to version 24.10, you can re-enable these via the command line.
Step 1. Prepare your System
Upgrading Ubuntu is a relatively simple process. Still, whenever making any significant changes to your OS, it’s best to take some steps to keep your data safe:
- Save and close any open files. Do the same for any active programs.
- If using a portable device, connect to AC power so the battery won’t fail as you update the OS.
- Ensure all your files are backed up using your chosen utility.
Next, check that your installation of Ubuntu 24.04 is fully up to date. The easiest way to do this is:
- Click on the Activities launcher and enter “software” into the search bar.
- Choose the Software Updater icon to check for updates automatically.
- If any updates are available, choose “Install Now” to continue.
Your computer may need to restart to finish installing updates. If so, select “Restart Now” from the Software Updater menu to continue.
You can also update Ubuntu 24.04 via the command line. Open Terminal, then run:
sudo apt update && sudo apt full-upgrade
Press “Y” to confirm you wish to update the OS to the most recent version.
Step 2. Get Ready To Upgrade
Once the system reboots, repeat the instructions outlined in the previous step to launch the Software Updater.
If further updates are available, download and apply them now before continuing. Once these have all been applied, you’ll see a Software Updater notification saying your system is up to date.

Choose “Settings” to launch “Software & Updates.” From here, select the “Updates” tab. In the dropdown menu labeled “Notify me of a new Ubuntu version,” choose “For any new version.” This means Ubuntu 24.10 will appear as an upgrade option, even though it’s not a Long-Term Support release.
Choose “Close,” then relaunch the Software Updater. You’ll now see a notification saying that Ubuntu 22.04 is up to date, but Ubuntu 24.10 is available. Choose “Upgrade” to continue.
If this notification doesn’t appear, you can also manually check for the latest version of Ubuntu via Terminal. Open the utility and run:
sudo update-manager -c
Step 3. Start the Upgrade
Once the Ubuntu upgrade utility launches, it will display a brief overview of everything new in Oracular Oriole. There’s also a link to the official release notes if you need a detailed breakdown.
After reading through these, click “Start Upgrade” to continue. This will download the latest release upgrade tool.

Next, the “Distribution Upgrade” will launch. You’ll notice a tilde next to “Preparing to Upgrade.” The tool will then update the OS software channels.
Once this is done, you’ll see a new window asking, “Do you want to start the upgrade?” Click “Details” for more information about the packages that will be changed/removed. Choose “Start Upgrade” to continue.
During the upgrade process, the system notified us several times that Oracular was not responding. We chose “Wait” in each case, and the upgrade continued without issue.
Step 4. Install Your Upgrades
Once you start the upgrade, Ubuntu will inform you that the lock screen will be disabled during the process. Select “Close” to continue.
The upgrade tool will then begin downloading and installing the necessary packages. During this stage, the desktop wallpaper will change to the default background for Oracular Oriole.

You may also see a prompt regarding “libc6” during the upgrade, asking whether Ubuntu should restart services during package upgrades without asking. Click “Next” to confirm.
If you want more detailed information on the installation process, choose “Terminal.”
Step 5. Cleaning Up
Once the installation stage is complete, the release upgrade tool will start cleaning up. A window asks if you wish to “Remove obsolete packages.”

Click on “Details” to view more information about these, then choose “Keep” or “Remove” as you see fit. If you’re uncertain, it’s usually best to remove these as they take up space on your hard drive.
Step 6. Confirm Your Upgrade
Once you’ve dealt with the obsolete packages, Ubuntu will prompt you to restart the system to complete the upgrade.
After logging in to the Ubuntu desktop, you can verify that the upgrade has worked by opening “Activities” and launching “About” from System Settings. From here, you can view key information, including the operating system, which should now display Ubuntu 24.10.

If you prefer using the CLI to check your OS version, open Terminal and run:
lsb_release -a
The OS “Release” should read 24.10 if the upgrade has worked successfully.
Step 7. Re-Enable PPAs and Repos
By default, whenever the Ubuntu OS is upgraded, any third-party repositories and/or PPAs are disabled. This ensures a smoother upgrade but also makes it difficult to update certain third-party software.
Luckily, you can easily enable the repos and PPAs again. To get started, open Terminal and run:
sudo nano etc/apt/sources.list.d/ubuntu.sources
This file lists all available software sources.

If you see any third-party repos listed, use the arrow keys to scroll down and remove ‘#’ at the beginning of the line. You can now save and exit the file using Ctrl + X, then Y.
These changes should take effect next time you run a system update.
Stay Updated
Even if you didn’t need to enable any third-party repos or PPAs in the previous step, keeping your system up to date is always a good idea.
You can do this in Ubuntu 24.10 the same way as Ubuntu 22.04. As outlined in Step 1, simply open “Activities” and enter “software” to launch Software Updater.
Ubuntu 24.10 also supports updates via Terminal via the latest version of APT (3.0). To update this way, enter:
sudo apt-get update && sudo apt-get upgrade
We recommend using the Terminal for this first update as if any third-party repos/PPAs are disabled, you’ll see an alert.
Upgrading via the Command Line
Experienced Linux users may want to upgrade Ubuntu via the command line. This can be much faster as there are no graphical windows to navigate.
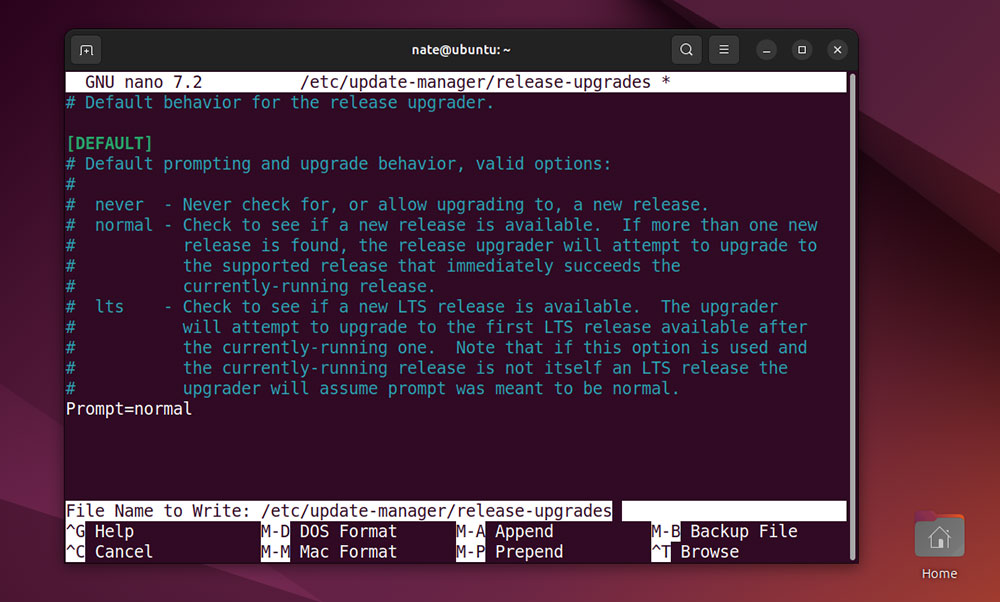
To get started, you need to configure Ubuntu 22.04 to allow upgrades to non-LTS versions of the OS.
Open Terminal and run:
sudo nano /etc/update-manager/release-upgrades

From here, change Prompt=LTS to Prompt=normal. Press Ctrl + x, then y to save and exit.
Next, ensure that Ubuntu 22.04 is fully up to date by running:
sudo apt-get update && sudo apt-get upgrade
You can now launch the upgrade tool via the command line with:
sudo do-release-upgrade
Press ‘y’, then follow the on-screen prompts to complete the upgrade. You can also enter ‘y’ to confirm the removal of obsolete packages.
We hope you found this step-by-step upgrade guide for Ubuntu 24.10 helpful, allowing you to benefit from the latest features and superior performance with the latest version of the OS.
Editor’s Note: The Ubuntu images and screenshots featured in this article are credited to Canonical.


