
Other than malware and hacking, nothing has the potential to be more dangerous to your Windows 10 or Windows 11 computer’s health than electrical failure.
Power outages resulting from weather or a variety of other events can occur in a flash and leave you with lost data.
Sure, having your computers and modems plugged directly into power surge protective strips helps to reduce the potential for damage. Surge protectors are effective protection against harmful glitches due to normally fluctuating energy levels.
But are you ready to resuscitate your power-gasping operating system when a sudden loss of electricity flatlines your computer gear?
Even after the power is restored, you face a risk of the hardware “being stuck” and failing to reboot. This is all the more a concern if you are away from the computer and nobody is around to flip the box’s power back on. That means your critical accessories — such as security cameras and wireless printers — remain offline after the lights come on.
The upgrade to Windows 11 brought some changes to the internal Microsoft wizardry. The processes detailed below might vary depending on your computer’s current version of Windows.
How To Auto Login to Windows
Being able to have Windows fully restart without having to sign in again after a power outage is handy. The process is simple, with only a few steps to apply.
One might think that Microsoft would have a system setting in plain sight for this task. But nope.
You are going to modify the Advanced User Accounts Control Panel. Keep in mind that several slightly different options are available to do some of this tinkering. These directions provide you with the simplest and most direct approach suitable for less-experienced Windows users.
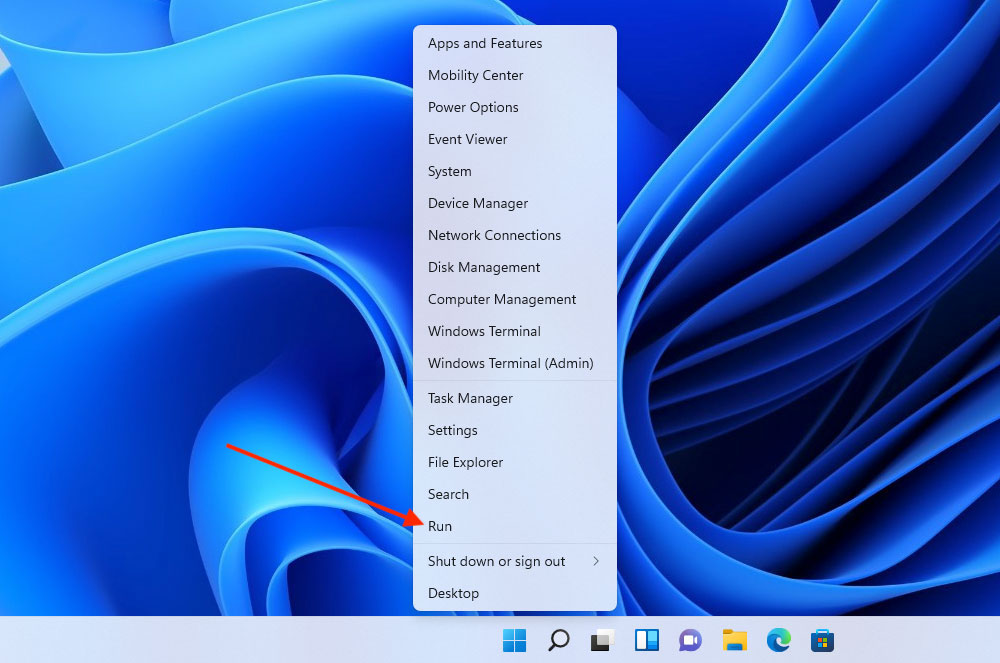
Step 1. Right-click the Start Menu button in the taskbar.

Step 2. Click the Run command at the lower end of the list of menu options.
Step 3. In the Run command window Open field, enter this command: netplwiz

Click OK or press the Enter key.
Step 4. Please note that recent Windows versions include a failsafe mechanism that will automatically trigger a restart in every situation where a system failure occurs to protect hardware components. The trick now is to configure the operating system to automatically restart without you being present to log in if you want to keep your security cameras and other essential peripherals online.
The key is to make changes in the Advanced User Accounts control panel applet. Despite that official name, depending on your version of Windows, it may not be either an applet or found in the Windows Control Panel.
Accessing this “Switch” varies with the Windows version (and sometimes build) you are running. Some steps overlap and work in either Windows version. Some do not.
Open the Advanced User Accounts settings by typing WIN+R in the Run dialog field.
In the Users tab, UNCHECK the box next to “Users must enter a user name and password to use this computer.”
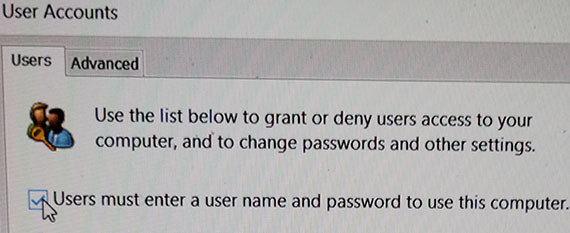
You should now see three fields labeled:
- User name
- Password
- Confirm Password
You must enter something in each field.
Step 5. This part can get a bit tricky. You must enter the “right” something in the User Name field. If you are using a Microsoft account, you must enter your entire email address used for signing into Windows. Just entering a default user name will not work.
The next two fields require your Windows login password. If you do not enter them both EXACTLY, the auto-login will not work.
Step 6. Click the OK button at the bottom right of the panel. This returns you to the User Accounts panel.
Step 7. If the APPLY button is not grayed out in the bottom right corner of this panel, be sure to click APPLY.
Step 8. Click the OK button at the bottom of this panel and restart your computer.
Notice that you do not have to enter your Windows login credentials. This confirms that your computer will automatically load to your Windows desktop whenever it is powered on.
Final Step: BIOS Settings
This next part of the process is probably more necessary to set up than the automatic login tweak detailed above. This is what to do so your computer will automatically restart after an electrical power supply interruption.
The first step is changing the power settings inside the computer BIOS (Basic Input/Output System). This is the software that starts up your computer and controls its basic operational functions.
To access the BIOS, push the power on button and immediately start pressing “DEL” or “F1” or “F2” or “F10” to enter the BIOS (CMOS) setup utility. CMOS stands for Complementary Metal-Oxide Semiconductor, the transistor technology that drives the computer’s microchips.
One of those keyboard keys will open the setup utility, depending on the manufacturer. Some computers display very briefly on the bottom of the screen which key combination works for your hardware. If you do not see it, check your user manual (now usually available on the manufacturer’s website).
Once inside the utility, scroll through the BIOS menu. Depending on the version installed, tabs will run across the top of the panel, or menu categories will be visible down the left edge of the utility’s panel.
Either way, scroll through the names until you find a setting named “Restore on AC/Power Loss” or “AC Power Recovery” or “After Power Loss.” It might be labeled as “Advanced” or “ACPI” or “Power Management Setup.”
Once you find this settings category, you will see three setting options:
- System stays off after system power is restored
- System powers on after system power is restored
- System returns to previous state after power is restored
Navigate the choices by moving the left/right or up/down arrows. Select the “Power On” option. Then press the Enter key to lock in your choice.
After you modify the power setting, follow the setup utility’s directions to save and exit the panel. Look for these three choices:
- Remain in setup
- Save changes and exit setup
- Discard changes and exit setup
Again, the exact method of navigation and appearance of the menu choices will vary depending on the manufacturer.
Windows 11 Boot-Up Refusal
I have found that Windows 11 is notably more finicky when it comes to recovering from a power interruption. This is mostly the case with desktop Windows computers because they lack internal batteries.
Power surges are one of the most common causes of booting issues with Windows in general because the sudden loss of power corrupts system files.
In my experience, the typical recovery methods for Windows 10 and earlier usually fail with Windows 11. If you can get Windows 11 to start the boot-up sequence, you have a chance. Beyond that, Windows computers without tech support plans usually end up being replaced.
Here are two last-effort recovery methods to try…
The first is jump-starting into Safe Mode, which is much different in Windows 11:
Step 1. Unplug the computer from the power outlet for five minutes, then plug it in again.
Step 2. Press and hold the power key for 10 seconds or more.
Step 3. Press the power key again while holding down F11 or F8. If neither works, you will need to check the manufacturer’s tech support for a registry hack.
The last-ditch recovery method is to force Windows 11 into Advanced Recovery Mode:
To start, make sure the computer is completely shut down.
Then, turn on the computer and immediately press the power button until the boot is interrupted, shutting down the computer.
Turn on the computer again while holding down the power button until the boot is interrupted and the computer shuts down. Do this one more time.
This will force a popup offering Startup Repair. Select the Advanced Options. Proceed to work your way through each of the options offered.
Ultimately, by the last option, the Windows 11 computer should end up booting into Safe Mode.
Suggest a Topic
Is there a tech tutorial you’d like to see featured?
Email your ideas to me, and I’ll consider them for a future column.
And use the Reader Comments feature below to provide your input!